When it comes to immigration, one of the most overlooked yet crucial steps is taking the perfect photo. You might think, “It’s just a photo, how hard can it be?” But trust me, a poorly taken picture can delay applications, trigger rejections, or even cause additional stress. Let’s break down everything you need to know about getting that perfect immigration photo.
Why Immigration Photos Are So Important
Immigration photos serve far more than just a visual purpose—they are a critical part of your legal identity. Every photo you submit becomes an official record that immigration authorities use to verify who you are. Unlike a casual selfie or a social media profile picture, these images are scrutinized meticulously. Any discrepancy between your photo and your physical appearance can trigger extra verification steps, potentially delaying your application. In many ways, your immigration photo acts as a first impression, establishing trust and authenticity for the authorities reviewing your documents.
Identification is the most obvious reason why a proper photo is vital. Your face is the primary biometric used to confirm your identity across passports, visas, residency cards, and other legal documents. Authorities rely on a clear, high-quality image to match you with your application and previous records. Even minor changes, like glasses or facial hair, can make a difference in biometric scanning systems. A mismatched or poorly taken photo may lead to repeated rejections or additional background checks, which can be frustrating and time-consuming.
Security is another major factor that underscores the importance of immigration photos. These images are not only used for individual identification but are also checked against global databases to prevent fraud, impersonation, and identity theft. Immigration authorities cross-reference your photo with watchlists, visa applications, and other international records. A clear and accurate photo ensures you pass these security checks smoothly, while a poorly captured one may raise red flags and result in further scrutiny. Think of it as the first line of defense in global security measures—it’s small but powerful.
Finally, standardization is key to maintaining consistency in immigration processing. Governments enforce strict guidelines regarding size, background color, head position, and facial expression to ensure every applicant’s photo can be assessed fairly and uniformly. This standardization allows officers to quickly compare faces without ambiguity or confusion. For instance, two photos with different lighting, angles, or backgrounds could make it difficult for automated systems to recognize you, leading to delays. By adhering to these standards, you not only make the process easier for yourself but also for the officials handling thousands of applications daily.
Standard Requirements You Should Know
When it comes to immigration photos, following the rules is not optional—it’s essential. Even small mistakes can lead to delays, rejections, or even additional fees. While every country has its own guidelines, most of the rules overlap. Here’s a comprehensive list of the key requirements you need to keep in mind:
- Photo Size: The most common standard is 2×2 inches (51x51mm), especially in the United States. Other countries, like Canada or the UK, may have slightly different dimensions, so always double-check the official guidelines. The size ensures that your face fills the frame adequately for identification and biometric scanning. Too large or too small can lead to automatic rejection.
- Background: A plain, light-colored background is a must. White or off-white works best because it provides a clear contrast with your facial features. Busy or patterned backgrounds are strictly prohibited—they can interfere with facial recognition systems and make your photo look unprofessional. Even shadows on the background can lead to rejection.
- Facial Expression: Neutral is the keyword here. Your mouth should be closed, eyes fully open, and eyebrows visible. No smiling, frowning, or exaggerated expressions. A neutral expression ensures that your face is recognizable and consistent with official records. Remember, immigration photos are for identification, not for your social media profile.
- Glasses and Accessories: Generally, glasses are not allowed. If you must wear them, ensure that your eyes are clearly visible and there’s no glare. Avoid sunglasses, tinted lenses, headphones, or large jewelry that might obscure your face. Anything covering your facial features can be grounds for rejection.
- Head Position and Orientation: Your head must be straight and facing the camera directly. No tilting, turning, or leaning. Both ears should be visible, and your face should occupy around 50–70% of the frame. Proper head positioning ensures that your photo can be accurately used for identity verification.
- Lighting: Even, well-lit photos are essential. Avoid harsh shadows on your face or the background. Natural daylight is ideal, but if you’re indoors, use balanced lighting from both sides. Poor lighting can obscure features, making it difficult for immigration authorities to process your photo.
- Clothing: Stick to simple, solid-colored attire. Avoid patterns, logos, and overly bright or dark colors that clash with the background. Hats, caps, or headgear are not allowed unless they are worn for religious purposes, and even then, your facial features must remain visible.
- Photo Quality: Blurry, pixelated, or overexposed photos are automatically rejected. Use a high-resolution camera and avoid filters or editing apps. A clear, crisp image ensures that facial recognition systems and human officers can identify you easily.
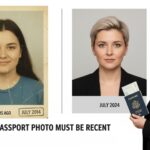
- Recent Photos: Immigration photos must be recent, typically taken within the last six months. Your current appearance must match the photo; outdated images showing different hairstyles, weight changes, or facial hair can lead to complications.
- Print and Digital Specifications: If submitting a printed photo, use high-quality photo paper with sharp detail. For digital submissions, check the resolution, file format (usually JPEG or PNG), and file size limits set by the immigration authorities. Low-quality prints or improperly formatted files may delay your application.
Choosing the Right Attire
| Category | Do | Don’t | Why It Matters | Tips |
| Color | Wear solid, medium or dark colors | Avoid patterns, stripes, or logos | Patterns and logos can distract from your face and may cause automatic rejection | Stick with navy, dark green, grey, or black shirts/blouses |
| Headgear | Only religious headgear that doesn’t obscure your face | Hats, caps, or fashion headgear | Covers or shadows on the head can hide facial features, violating photo guidelines | Ensure headgear doesn’t cast shadows on your face |
| Accessories | Keep minimal jewelry that doesn’t block the face | Large earrings, heavy necklaces, or glasses with glare | Over-accessorizing can obscure facial features or create reflections | Remove dangling earrings and bold necklaces for clarity |
| Makeup | Light and natural | Heavy makeup or bright colors | Strong makeup can distort natural features, affecting identification | Use subtle tones to enhance natural appearance |
| Shirt/Top Style | Simple, high-contrast tops without patterns | Busy patterns, logos, or flashy designs | Solid, simple tops help your face stand out against a light background | Collar shirts or plain blouses work best |
Lighting Makes or Breaks Your Photo
Lighting is one of the most crucial elements of a good immigration photo, yet it is often overlooked. Think about the last time you took a selfie in dim light—your face was probably hard to see, shadows distorted your features, and the overall image looked unprofessional. The same principle applies to official photos, but with much higher stakes. Poor lighting can obscure facial features, create uneven skin tones, and even cast shadows on the background, which may result in your photo being rejected. Getting the lighting right ensures that your face is clearly visible and identifiable to immigration officers and biometric systems.
Natural light is your best friend when taking an immigration photo. Position yourself facing a window, so your face is evenly illuminated. Avoid direct sunlight, as it can produce harsh shadows or create overexposed areas on your face. If natural light isn’t available, set up multiple light sources to balance illumination on both sides of your face. This ensures that no side is too bright or too dark, providing a clean and clear image. Even lighting highlights your facial features accurately and gives the photo a professional, official look.
Shadows are the biggest enemy of a compliant immigration photo. Shadows can distort the natural shape of your face, obscure important features like your eyes or jawline, and even create a misleading impression of your appearance. It’s important to check both your face and the background to make sure no shadows are present. A uniformly lit background prevents confusion for officers and makes it easier for automated systems to detect and process your facial features accurately. Even subtle shadows along the jaw or neck can be enough to cause a rejection.
Finally, the quality of lighting not only affects visibility but also consistency across different photos. If your photo is too dark, facial recognition software may struggle to match it with existing records. If it’s too bright, your features can appear washed out, making you look different from your true appearance. Consistent, balanced lighting ensures that your photo meets the standardized requirements for immigration purposes, avoids unnecessary delays, and increases the likelihood of a smooth application process. Proper lighting might seem simple, but it can literally make or break your immigration photo.
Facial Expression Tips
Getting your facial expression right is more important than most people realize. Immigration photos are not glamour shots—they are official records meant to identify you. Even small deviations in expression can make it harder for authorities to match your face with previous or future records. Here’s a comprehensive list of tips to ensure your expression is perfect:
- Maintain a Neutral Expression: Avoid smiling, frowning, or any exaggerated facial gestures. A neutral expression ensures that your face remains consistent with official records and biometric systems. Even a slight grin can distort features like the shape of your mouth or cheeks, which can be problematic for identification.
- Keep Your Eyes Open and Focused: Your eyes must be fully open and looking directly at the camera. This allows authorities to clearly see your eye shape and position, which is a key feature in facial recognition. Squinting, looking away, or blinking can result in the photo being rejected, so take a deep breath and focus before snapping the picture.
- Mouth Closed, Teeth Hidden: Your mouth should remain closed, with no teeth showing. Open-mouth smiles or partially open lips can alter the natural shape of your face. Keeping your mouth closed ensures that your photo meets standardized requirements and provides a consistent reference for identification.
- Relax Your Face: Tension in your jaw or forehead can make your expression look unnatural. Take a few seconds to relax your facial muscles before the photo is taken. A relaxed face ensures that your features are clearly defined and helps produce a more accurate representation of your appearance.
- Natural, Yet Serious: Imagine you’re looking at a friend you haven’t seen in a long time but want to stay serious. This mental trick helps you maintain a calm, natural expression without forcing a smile or frown. It also prevents your facial features from appearing stiff or artificial.
- Check Symmetry: Slight tilts or uneven expressions can affect how your photo is perceived. Ensure your head is straight, your eyes are level, and both sides of your face appear balanced. Symmetry is key for both visual appeal and compliance with official standards.
- Avoid Overthinking: While it’s important to follow the rules, overthinking your expression can make it look unnatural. Take a deep breath, relax, and think of maintaining a simple, calm demeanor. This helps produce a photo that is both compliant and reflective of your true appearance.
Framing and Composition
| Category | Do | Don’t | Why It Matters | Tips |
| Face Proportion | Ensure your face occupies 50–70% of the frame | Too small or too large face in the frame | Correct face proportion helps officers and automated systems recognize your features accurately | Stand at a proper distance from the camera so your face fills the frame without cutting off the top of your head |
| Head and Shoulders | Include the full head and top of shoulders | Cropping out part of the head or shoulders | Shows the complete head structure for identification purposes | Use a camera angle that captures both head and shoulders clearly |
| Centering | Position your face directly in the center of the frame | Tilt or lean your head, or shift your body | Centered face ensures symmetry and makes identification easier | Imagine your face fitting into a perfect stamp or ID frame |
| Eye Level | Keep eyes level with the camera lens | Looking up, down, or sideways | Eye-level orientation is required for biometric scanning and official verification | Use a tripod or stable surface to align the camera with your eyes |
| Posture | Sit or stand straight with shoulders relaxed | Slouching or leaning | Straight posture prevents distortion of facial features and ensures clarity | Take a few test shots and adjust posture before final capture |
Hair and Grooming Tips
When it comes to immigration photos, small details in hair and grooming can make a surprisingly big difference. A neat, well-maintained appearance ensures that your facial features are clearly visible and your photo meets official standards. Even minor issues like stray hairs or obscured eyebrows can result in rejection, causing delays in your application process. Paying attention to these details is a simple way to avoid unnecessary headaches and ensure your photo is accepted the first time.
Starting with hair, it’s essential to keep it tidy and away from your face. Hair that falls across your eyes, cheeks, or forehead can obscure important features, making it difficult for officers to clearly identify you. Whether your hair is long or short, make sure it’s brushed, styled neatly, and doesn’t cast shadows on your face. Avoid extreme hairstyles that might alter your natural appearance or draw attention away from your face, as immigration photos are meant to highlight your features, not your fashion sense.
Beards and facial hair are allowed in most countries, but they must not cover key facial features. A beard that hides your jawline, chin, or cheeks can lead to photo rejection. If you regularly change your facial hair style, try to keep it consistent with how you usually appear in official documents. This consistency helps avoid confusion when your photo is compared with past or future applications. For mustaches, ensure they do not extend over your mouth, and for sideburns, make sure they don’t interfere with the shape of your face.
Eyebrows are another critical element that often gets overlooked. Some countries have strict rules about visibility, and hidden or obscured eyebrows can result in a rejected photo. Keep your eyebrows well-groomed and fully visible, avoiding bangs or hair that drapes over them. Clear visibility of eyebrows is important because they help define your facial structure and are used in facial recognition systems. Paying attention to these small grooming details ensures that your photo looks professional, meets standards, and accurately represents your appearance.